HEVC (High Efficiency Video Coding, sometimes called H.265) is not new video compression format or people, and is the successor of H.264. It could offers 50-75% more compression efficiency compared to H.264 video, while retaining the same visual quality."I heard that Apple issued a new update support for H 265 codec for FCP X. But why my newly updated FCP X can not support H.265 videos? How can I open H.265 videos in FCP X without any issue? Is anyone here know the efficient workflow?"Recently on the forums there are many users have encountered the HEVC H.265 to FCP X importing and editing programs, most of them can’t load recorded HEVC H.265 videos to Final Cut Pro X, and they don’t know the effective way to solve this issue. As we know, not all the video formats are well supported by final cut pro X, from FCP X official product page you will know that the native supported format of FCP X is Apple ProRes codec MOV format, the other formats will not be natively supported by FCP X.Just as showed above, in order to import HEVC/H.265 to FCP X, you will need to convert HEVC/H.265 to Apple ProRes codec MOV which is FCP X supported format. Pavtube Video Converter for Mac(best H.265 converter for Mac Review) has pre-set FCP X compatible format such as ProRes 422, ProRes 422 HQ, ProRes Proxy, ProRes 422 LT, ProRes 4444, it able to provide most reliable and professional H.265 solutions to FCP X issues.In general, it provides hundreds of output format presets, besides Apple ProRes for FCP, it also provide DNxHD for Avid, MPEG-2 for Adobe Premiere, AIC for iMovie .etc. Apart from H.265, this ideal converter is also available to deal with other video formats including MTS, MXF, MOV, XAVC, MKV, AVI .etc.The trail-before-purchase is supported, just feel free to try it:
 The following two suggestions may be of some help to you:
- When converting video to Final Cut Pro oriented format templates(e.g. Apple Prores), please ensure that your computer has Final Cut Pro installed, otherwise the converted files will have audio only without image.
- If you are using FCP X, please make sure you have installed ProApps QuickTime Codecs, or you may get files with sound only without video.
How to Get H.265 Supported in Final Cut Pro XStep 1: Add H.265 footage to the program.Launch the software on your Mac computer, click "File" menu, select "Add Video/Audio" or "Add from folder" to import H.265 footage to the program. Step 2: Choose output format.Click "Format" bar, from its drop-down options, move your mouse to "Final Cut Pro > Apple ProRes 422 (*.mov)" to select it as the output file format.
 Read the difference of ProRes. • Apple ProRes 422 – Higher quality than Apple ProRes 422 (LT); • Apple ProRes 422 (HQ) – Keep original video quality for editing in FCP X; • Apple ProRes 422 (LT) – Get a smaller file sizes than Apple ProRes 422; • Apple ProRes 422 (Proxy) – SD levels – 480i/p and 576i/p. Used in offline workflows. • Apple ProRes 4444 – Edit and finish 4:4:4 material. Actually, different Apple ProRes codec corresponds to different needs. Here you can refer to this article "Differences among Apple ProRes codec". Step 3: Customize output ProRes parameters.Open "Profile Settings" window to adjust the output video codec, size, bit rate, frame rate, audio codec, sample rate, bit rate and channels.
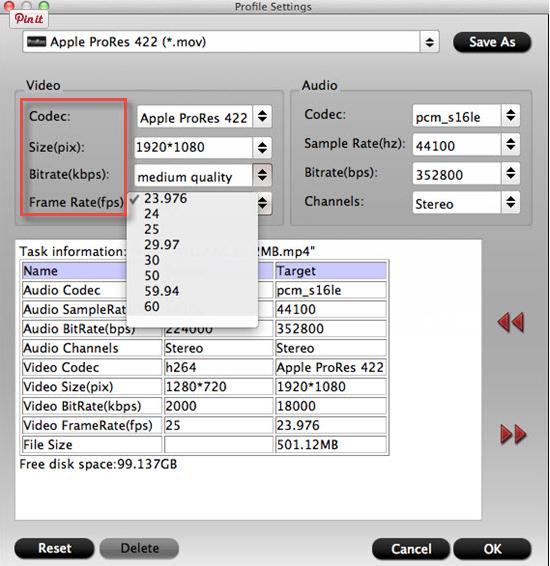 Step 4: Convert H.265 Video to FCP X.Hit the convert button under the preview windows, the program will start H.265 footage to Apple ProRes MOV conversion for Final Cut Pro X.When the conversion is completed, run FCP X and import the ProRes codec footage for post production workflow.If you are running on Windows,for other windows NLEs please get Pavtube Video Converter.Also see:Many companies have already begun to use HEVC for streaming 4K content:Netflix has begun to use HEVC to stream 4K content to few 4K TVs equipped to decode HEVC. Leading television manufacturer like LG, Samsung, Sony, Vizio, Panasonic and Toshiba will manufacture TVs with HEVC support and those TVs will be able to stream 4K content.Amazon has amalgamated with few other studios like Warner Bros, Lionsgate, 20th Century Fox and Discovery for streaming 4K content using HEVC.Streaming service M-go has also announced the same via an app for Samsung TVs.Some smartphone like Sony Xperia Z2 has included HEVC support to shoot 4K video.Read More:
H.264H.264 or MPEG-4 Part 10, Advanced Video Coding (MPEG-4 AVC) is a video coding format that is currently one of the most commonly used formats for the recording, compression, and distribution of video content.It is used in many places including Blu-Ray players, as well as videos streamed through sites like YouTube. It is also used in some TV broadcasts.H.264 & iMovie incompatible issuesH.264 video streams can be contained in various containers such as MPEG-4 part 14 (.mp4), MOV, Matroska (.mkv), 3GP (.3gp), or Flash video (.flv).  So folks met the incompatible issue:I shoot with a Canon EOS and its native video is on H.264 codec. I used to edit by importing the native H.264 footage into iMovie(11), but found trouble when it was really slow and didn't flow smoothly.
I was trying to bring a .mov file to iMovie 11, but the filename is greyed out in the finder window so I can't select it. According to the QuickTime inspector, the video was encoded in H.264. The problem I’m facing now is how can I import H.264 to iMovie for further editing without any hassle. Why iMovie unfriendly with H.264Will iMovie(iMovie 11) support H.264 codec? As far as I know H.264 is supposed to be a supported codec in iMovie. However, if aspect ratio and frame rate can’t fit iMovie editing, it will still reject your H.264 files. What’ more, H.264 is highly compressed. It is not designed as a format for editing. That's not where you want to start with editing for high quality results. Solution: transcode H.264 to iMovie most compatible Apple InterMediate CodecLuckily, you can get the H.264 format video recognized by iMovie (iMovie 11) easily. What you need is only a Mac video converter that can convert H.264 to iMovie most compatible Apple InterMediate Codec. It can ensure the best results when editing H.264 files in iMovie on your Mac. Pavtube Video Converter for Mac (Top 8 iMovie Converter for Mac Review) is just what you need, which has optimized preset for iMovie. Enable you to transcode MP4 to AIC .mov for using in iMovie directly without any rendering or codec problems. Plus, it also allows you to convert MP4 to ProRes for FCP, DNxHD for Avid, etc editing with best results. It would be finished with only 3 clicks without losing video quality.The trail-before-purchase is supported, just feel free to try it: How to convert H.264 to Apple InterMediate Codec1.Drag the H.264 files to the software. Or you can also click "Add" button to import video to the program. It supports batch conversion and joining multiple video clips into one file. 2.You can directly choose the preset iMovie/FCE --> Apple InterMediate Codec(AIC) (*.mov) as the output format.
  3.Adjust the video and audio parameters, including the Bitrate of Video&Audio, Video Size, Sample Rate, Frame Rate, Audio Channels, etc., by clicking the Settings button on the main interface for getting the best quality. 1080p/720p video size, 30fps frame rate, are the optimal settings for iMovie.
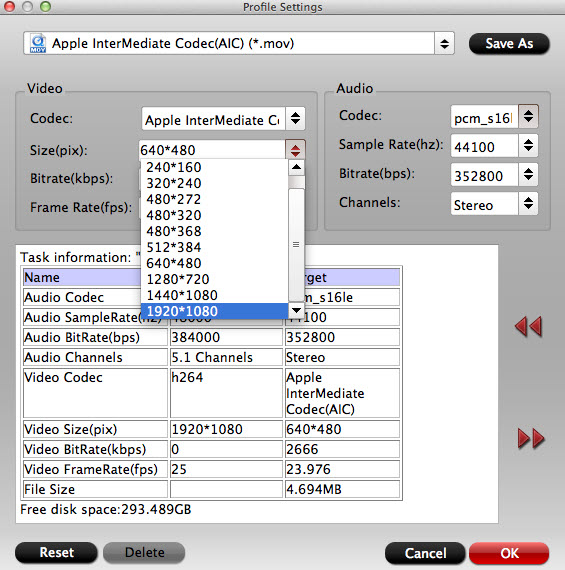 4. click on the Convert button to start transcoding H.264 to iMovie. After the conversion, click "Open" to locate the result videos and then you can start fun away with editing H.264 footage in iMovie 08/09/11 without problems.Read More:
DNxHD is a video codec intended to be usable as both an intermediate format suitable for use while editing and as a presentation format. DNxHD data is typically stored in an MXF container, although it can also be stored in a QuickTime container.In general, the Avid DNxHD MXF can be imported into Avid Media Composer easily. However, from the forum, there are still many and many people has the import and edit issues with Avid DNxHD MXF & Avid Media Composer, just like this:I am unsuccessful importing an Avid DNxHD 220 (MXF) file using the straight up Preset within Avid Media Composer. The error message in the Error Log is “Import Error Error compiling move. I/O Error.”As Avid MC CC documentation, there is supposedly no need to install any extra codec. Is that really the case?Brief method if you would like to tryAvid Media Composer does support MXF import/export, but only for a several codecs (which are pretty much acquisition/camera codecs), and i don't believe DNxHD is included, but you could check the online manual for your version of Avid Media Composer for specifics.You can definitely convert the MXF to an MOV container and keep the same codec (DNxHD) if you have the avid QuickTime components installed the steve mentions (they are a free download from avid). and you could export that from your Avid Media Composer.All-in-one solution for transcoding DNxHD MXF to Avid Media ComposerThe fast and easy solution is to transcode DNxHD MXF to Avid Media Composer favorable format Avid DNxHD MOV keep the same codec. You can get this professional and powerful Pavtube iMixMXF, applying which you can convert and deinterlace DNxHD MXF to DNxHD DNxHD MOV, the compatible video format for Avid MC on Mac OS X without any video and audio problem.Other More Key Features of Pavtube iMixMXF
- iMixMXF Supports batch convert DNxHD MXF files with amazing quality and fast speed.
- iMixMXF can help you convert then import DNxHD MXF video to FCP X/7, iMovie, FCE, Avid MC, Premiere Pro/CS 4/CS 5/CS 6, Pinnacle Studio, QuickTime, iTunes and other editing applications.
- iMixMXF supports import DNxHD MXF to all Apple/Android/Windows tablet and smartphone.
- Batch conversion, concise guidance, friendly interface, three steps, fast speed and best quality.
- Allows us to edit DNxHD MXF video files: Clip, Crop, Merge, Apply effect, set output parameter, Snapshot, Rotate etc.
The trail-before-purchase is supported, just feel free to try it, it is 100% clean and safe: How to Convert DNxHD MXF Files to DNxHD Codec MOV for Avid Media ComposerDownload and install Pavtube iMixMXF Converter on Mac (compatible with Mac OS X 10.11 El Capitan, 10.10 Yosemite, 10.9 Mavericks, 10.8 Mountain Lion, 10.7 Lion, 10.6 Snow Leopard, 10.5 Leopard and lower versions). Run this program, you will find the interface is very brief, this program is very easy to use.Step 1. Add DNxHD MXF filesClick "Add Video" button to load DNxHD MXF files to the program. You can also directly drag the video files into the program directly.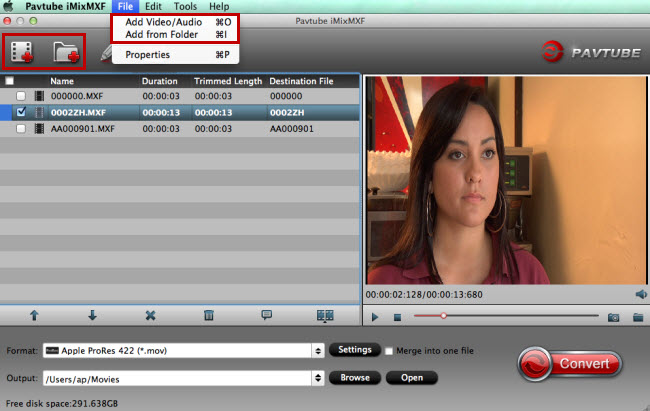 Step 2. Select output formatFrom "Format" drop-down lists, you can select Avid Media Composer preferable editing codec from "Avid Media Composer" > "Avid DNxHD(*.mov)" as the output format.
 Tip: If you like, adjust video and audio parameters, including the Bitrate of Video and Audio, the Codec of Video and Audio, Video Size, Sample Rate, Frame Rate, Audio Channels, etc., by clicking the Settings button on the main interface for getting the best quality.
 Step 3. Start the conversionFinally, simply hig the big Convert button to start converting DNxHD MXF to Avid Media Composer friendly video formats. Within several minutes, you can find the converted file on your computer by clicking the "Open" button. And then you can import the converted files to Avid Media Composer easily.Related program:Pavtube Media Magician / Mac Version: A nice camcorder assistant manager, lossless camcorder video joiner, MTS/ M2TS/ MXF/ P2 MXF/ MOV/ MKV/ TiVo/ WMV/ AVI/ MPG converter and editor. Meamwhile it supported upload edited video to YouTube directly.Read More:
DaVinci Resolve can handle much more native video formats and camera files than any other real time editing system. However, it cannot handle the XDCAM MXF footage from Sony cameras. That's why you found it's a painful experience to import XDCAM MXF files to DaVinci Resolve Lite/DaVinci Resolve 11 for editing.  On many HD video editing forums, there are many users complained about the issue to import XDCAM MXF to DaVinci Resolve Lite/DaVinci Resolve 11 for editing. So users can’t load the XDCAM MXF footages to DaVinci Resolve Lite/DaVinci Resolve 11 for editing smoothly. How to solve this XDCAM MXF to DaVinci Resolve Lite/11 importing and editing issue easily?To make XDCAM MXF files compatible with DaVinci Resolve Lite/DaVinci Resolve 11, the easy and reliable workaround is to transcode XDCAM MXF to DaVinci Resolve Lite/DaVinci Resolve 11 supported video formats such as QuickTime, ProRes, DNxHD first.In order to make converting task easily and quickly, Pavtube Video Converter for Mac is highly recommended. This program features high efficiency and seamless conversion. With it, you can transcode XDCAM MXF to DaVinci Resolve Lite/DaVinci Resolve 11 compatible video(QuickTime, ProRes, Avid DNxHD is well supported by this powerful editing system) with original quality.The trail-before-purchase is supported, just feel free to try it: Key Features:
- Three simple clicks to convert XDCAM MXF videos to Davinci Resolve Lite/11 compatible formats.
- Aside from Davinci Resolve Lite/11, you can directly convert XDCAM MXF to iMovie, QuickTime, Windows Movie Maker and more video editors supported formats without additional settings.
- Edit your XDCAM MXF videos before converting them. With the built-in editor, you can trim or crop your videos. And you are able to add subtitles and watermarks to the videos as well.
- Perfectly compatible with Mac OS X 10.11 El Capitan, 10.10 Yosemite, 10.9 Mavericks, 10.8 Mountain Lion, 10.7 Lion and 10.6 Snow Leopard.
If you are running on Windows, please get Pavtube Video Converter.How to Convert and Import XDCAM MXF Files to Davinci Resolve Lite/11Step 1. Add XDCAM MXF filesClick "Add Video" button to load .mts files to the program. You can also directly drag the video files into the program directly.Step 2. Select output formatAs is mentioned above, Avid DNxHD is well supported by Davinci Resolve Lite. So just click the format bar to follow “Avid Media Compose” > “Avid DNxHD 720p (*.mov)” or “Avid DNxHD 1080p (*.mov).”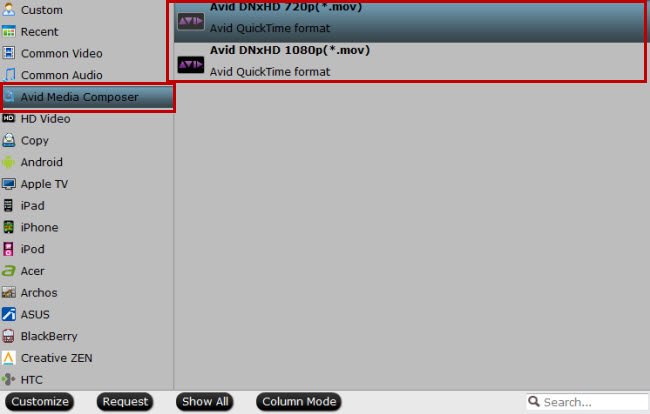 Tip: If you like, adjust video and audio parameters, including the Bitrate of Video and Audio, the Codec of Video and Audio, Video Size, Sample Rate, Frame Rate, Audio Channels, etc., by clicking the Settings button on the main interface for getting the best quality.Step 3. Start the conversionFinally, simply hig the big Convert button to start converting XDCAM MXF to Davinci Resolve Lite friendly video formats. Within several minutes, you can find the converted file on your computer by clicking the "Open" button. And then you can import the converted files to Davinci Resolve Lite/11 easily.Read More:
DaVinci Resolve Lite/DaVinci Resolve 11 can handle much more native video formats and camera files than any other real time editing system. However, it cannot handle the P2 MXF footage from Panasonic P2 camcorder. That's why you found it's a painful experience to import P2 MXF files to DaVinci Resolve Lite/DaVinci Resolve 11 for editing.On many HD video editing forums, there are many users complained about the issue to import P2 MXF to DaVinci Resolve Lite/DaVinci Resolve 11 for editing, the DaVinci Resolve Lite/DaVinci Resolve 11 video editing software can’t support P2 MXF video files recorded by Panasonic. So users can’t load the P2 MXF footages to DaVinci Resolve Lite/DaVinci Resolve 11 for editing smoothly. How to solve this P2 MXF to DaVinci Resolve Lite/DaVinci Resolve 11 importing and editing issue easily?Read through some posts online, I have found some similar (but not identical) problems like no audio, import slowly… After looking into this more, I know that DaVinci Resolve Lite/DaVinci Resolve 11 work fine if you import your P2 MXF footages directly from cameras or P2 card, but if you have already copied MXF recordings to your HDD or you download them from somewhere, the importing error may jump out.To make P2 MXF files compatible with DaVinci Resolve Lite/DaVinci Resolve 11, the easy and reliable workaround is to transcode P2 MXF to DaVinci Resolve Lite/DaVinci Resolve 11 supported video formats such as QuickTime, ProRes, DNxHD first.To convert P2 MXF to DaVinci Resolve Lite/DaVinci Resolve 11 easily and quickly, Pavtube iMixMXF (Best Mac (multi-track) MXF Converter Review) is highly recommended. This program features high efficiency and seamless conversion. With it, you can transcode MTS to DaVinci Resolve Lite/DaVinci Resolve 11 compatible video(QuickTime, ProRes, Avid DNxHD is well supported by this powerful editing system) with original quality. Besides, it can support the multiple audios as output, would you like to have a try?The trail-before-purchase is supported, just feel free to try it, it is 100% clean and safe: More Features of Pavtube iMixMXF:Convert P2 MXF video filesiMixMXF Supports batch convert Panasonic MXF, AVCHD, MTS, M2TS, video to MP4, H.264, MPEG-4, M4V, MOV, DV, MPEG-2, FLV, SWF, 3GP, AVI, WMV, ASF, HD Video etc with amazing quality and fast speed.Import P2 MXF video to editing softwareiMixMXF can help you convert then import P2 MXF video to FCP X/7, iMovie, FCE, Avid MC, Premiere Pro/CS 4/CS 5/CS 6, Pinnacle Studio, QuickTime, iTunes and other editing applications.Transfer P2 MXF Files to any deviceiMixMXF supports import MXF, AVCHD, MTS, M2TS, files to all Apple/Android/Windows tablet and smartphone.Easy to useBatch conversion, concise guidance, friendly interface, three steps, fast speed and best quality.Edit P2 MXF filesAllows us to edit P2 MXF video files: Clip, Crop, Merge, Apply effect, set output parameter, Snapshot, Rotate etc.If you are a Windows user, and in need of edit the P2 MXF videos in Windows Movie Maker,Sony Vegas, Adobe After Effects,etc. Please turn to Pavtube MXF MultiMixer Converter.How to Convert P2 MXF Files to DNxHD for DaVinci Resolve Lite/11Connect the P2 camcorder to computer and transfer P2 MXF files to hard drive. Download the Pavtube iMixMXF Converter and install it to your Mac(compatible with Mac OS X 10.11 El Capitan, 10.10 Yosemite, 10.9 Mavericks, 10.8 Mountain Lion, 10.7 Lion, 10.6 Snow Leopard, 10.5 Leopard and lower versions).Step 1. Add P2 MXF filesClick "Add Video" button to load P2 MXF files to the program. You can also directly drag the video files into the program directly.Step 2. Select output formatAs is mentioned above, Avid DNxHD is well supported by DaVinci Resolve Lite/11. So just click the format bar to follow “Avid Media Compose” > “Avid DNxHD 720p (*.mov)” or “Avid DNxHD 1080p (*.mov).”Tip: If you like, adjust video and audio parameters, including the Bitrate of Video and Audio, the Codec of Video and Audio, Video Size, Sample Rate, Frame Rate, Audio Channels, etc., by clicking the Settings button on the main interface for getting the best quality.Step 3. Start the conversionFinally, simply hig the big Convert button to start converting P2 MXF to DaVinci Resolve Lite/DaVinci Resolve 11 friendly video formats. Within several minutes, you can find the converted file on your computer by clicking the "Open" button. And then you can import the converted files to DaVinci Resolve Lite/DaVinci Resolve 11 easily.Related program:Pavtube Media Magician / Mac Version: A nice camcorder assistant manager, lossless camcorder video joiner, MTS/ M2TS/ MXF/ P2 MXF/ MOV/ MKV/ TiVo/ WMV/ AVI/ MPG converter and editor. Meamwhile it supported upload edited video to YouTube directly.Read More:
Can After Effects CS6 Support MXF Files?Since After Effects CS4, MXF is supported by AE. However, MXF is a container format, After Effects can only import some kinds of data contained within MXF files. Many users still have troubles when importing MXF to After Effects (including After Effects CS6). What’s available workaround to successfully edit MXF files in After Effects without any issue? MXF (Material Exchange Format) is a container format for professional digital video and audio media defined by a set of SMPTE standards. As MXF container is not so widely accepted as MP4, AVI, and WMV format, it is unacceptable to many editing software. HD digital camcorders’ video like Canon C300, Canon XF100, Canon XF105, Sony XDCAM series and Panasonic P2 series still can not natively or directly imported to Adobe After Effects CS6.How to Make After Effects CS6 Support MXF Files?In that case, MXF is not a proper format for editing. You can definitely convert MXF files to Adobe After Effects CS6 codec with the native quality before importing. And video formats supported by After Effects CS6 include MPEG-2, WMV (VC-1), etc.Here I highly recommend Pavtube MXF Converter. It is the most professional and easy-to-use MXF to FCP X Converter, which can convert your MXF files to FCP X compatible formats with the 6X faster conversion speed and best output quality on Mac. Also it offers you other functions like convert MXF to 3D video, define video/audio parameters, add video watermark, etc. Below is a detailed guide on how to convert MXF to After Effects CS6 more compatible video format like convert MXF to MPEG-2.The trail-before-purchase is supported, just feel free to try it, it is 100% clean and safe:
 Key Feature of Pavtube MXF Converter:1. Convert MXF to other videosPowerful video converting software can help you convert MXF to MP4, AVI, MOV, WMV, HD videos, MP3.2. Support professional video editing softwareTranscode MXF files to Sony Vegas, Adobe Premiere, Windows Movie Maker, Avid, etc.3. Merge source MXF filesJoin different source MXF videos together and output a single video. Then you can enjoy a long output movie.4. Adjust output video effectTo customize the output profile, users can adjust the output Resolution, Bitrate, Frame Rate, Encoder, Channels, and Sample Rate.Tips: The conversion speed is very fast because it supports batch conversion and NVIDIA CUDA & ATI Stream (AMD APP) acceleration technologies. It converts multiple video clips at the same time, moreover it can shut down computer after the process is complete, so run the app overnight and you could enjoy the created videos next morning when you are up.If you are a Mac user, and in need of edit the MXF videos in Final Cut Pro 7 / X, iMovie,Avid Media Composer, etc. Please turn to Pavtube MXF Converter for MacHow to Convert MXF Files to MPEG-2 for After Effects CS6Download and install Pavtube MXF Converter on your PC (compatible with Windows 10, Windows 8, Windows 7, Windows XP, Windows Vista, and Windows 2000). Run this program, you will find the interface is very brief, this program is very easy to use.Step 1: Now please click add files button to import the MXF video files from your camera or from a folder stored on your HDD that you want to convert, you can add batch files at one time.
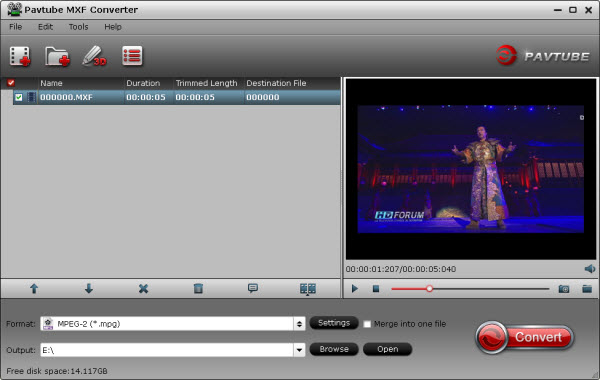 Note: MXF systems produce split A/V which means the video and audio are stored in separate files. Some careless editors may only import the video files into an MXF converter. The result is that there will be no audio in the output video. Make sure that the whole MXF file structure is transferred before converting.Step 2: Go to the format list and pick “MPEG-2 (*.mpg)” under “Adobe Premiere/Sony Ve…” option.
 Step 3: If you would like to customize the video and audio parameters, you can click "Settings", adjust the parameters as you want, like Video Codec, aspect ratio, bit rate, frame rate, Audio codec, sampling rate, bit rate, channels.
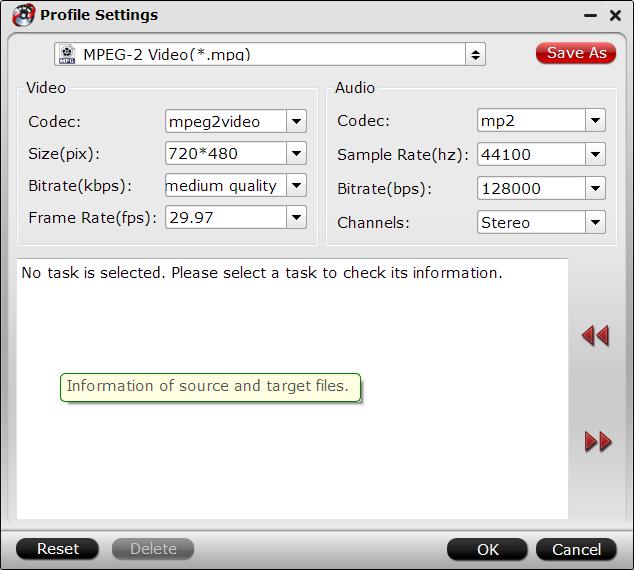 Step 4: Click "Convert" to start to convert MXF to After Effects CS6 MPEG-2 for native editing.Once the conversion completes, simply click “Open” button to get the converted MPEG-2 files. And now you can bring the output MPEG-2 files into After Effects CS6 to create your own masterpieces.Related program:If you have multiple-track videos requirements, Pavtube MXF MultiMixer / Pavtube iMixMXF would be your best-choice: It is able to import and export MXF video files with multiple audio tracks/channels as well as mixing the multiple audio tracks/channels into one. Convert MXF video files from popular devices such as Apple, Samsung, Sony, Canon, JVC, Panasonic, etc. to various video format supported by any media player and NLEs.Read More:
“I recently got myself a Sony A7s (great little camera!) that shoots in XAVC-S.However, most of the time the XAVC-S files don't show up when choosing Import in FCP X.Any way to make the XAVC-S files show up in the import window?”Based around the XAVC S codec, a more highly compressed (Long GOP) version of pro-friendly XAVC/H.264 Level 5.2, videos are encoded in an MP4 wrapper, which means they should be relatively widely supported.Although Final Cut Pro X with stunning features is a popular video editing software for users, the compatibility between 4K videos and Final Cut Pro X is still an unsolved mystery in that some XAVC-S videos can be imported into FCP X, while the some XAVC-S videos can not. To import and edit XAVC S files in FCP X, you will need to do some preparation before editing. The easy workaround I’ve worked out is to find a way to transcode Sony XAVC S to FCP X editable Prores codec in 1080p. Such as ProRes 422, ProRes 422 HQ, ProRes Proxy, ProRes 422 LT, ProRes 4444 video.>> Types of Apple ProRes Codecs Therefore, the easy workaround is, get Pavtube Video Converter for Mac (Best XAVC/XAVC S Video Converter for Mac Review) to convert XAVC S to ProRes, which will save you both time and trouble, and all you need is to drag the result videos for prompt editing.Plus, you may also encode XAVC S to Avid Media Composer, Adobe Premiere Pro, iMovie and more NLE programs highly compatible formats for smooth editing. Besides, it might help you change XAVC to other frequent formats like MOV, MKV, MP4, AVI, etc for playback on media devices. The trail-before-purchase is supported, just feel free to try it: Key Feature of Pavtube Video Converter:
- Support nearly all HD/SD video and audio formats to various video and audio format;
- Make videos & movies & audios compatible with Android tablets/Phones, Apple devices, Mac OS X El Capitan, video game console, websites and more;
- Edit videos with trim, crop, split, merge and special effects;
- Process videos and movies in batch even faster and easier;
- Attach external *.srt, *.ass, or *.ssa subtitles into source media for entertainment;
- Support perfect audio and video synchronization.
Install and run it, you will see the interface. The following is a simple instruction of how to use this Pavtube Video Converter for Mac:Notes: 1.When converting video to Final Cut Pro oriented format templates(e.g. Apple Prores), please ensure that your computer has Final Cut Pro 7 installed, otherwise the converted files will have audio only without image.2.If you are using FCP X, please make sure you have installed ProApps QuickTime Codecs, or you may get files with sound only without video.How to Get XAVC S Support in Final Cut Pro XStep 1: Add XAVC S footage to the program.Launch the software on your Mac computer, click "File" menu, select "Add Video/Audio" or "Add from folder" to import XAVC footage to the program.Step 2: Choose output format.Click "Format" bar, from its drop-down options, move your mouse to "Final Cut Pro > Apple ProRes 422 (*.mov)" to select it as the output file format.Read the difference of ProRes. • Apple ProRes 422 – Higher quality than Apple ProRes 422 (LT); • Apple ProRes 422 (HQ) – Keep original video quality for editing in FCP; • Apple ProRes 422 (LT) – Get a smaller file sizes than Apple ProRes 422; • Apple ProRes 422 (Proxy) – SD levels – 480i/p and 576i/p. Used in offline workflows. • Apple ProRes 4444 – Edit and finish 4:4:4 material. Actually, different Apple ProRes codec corresponds to different needs. Here you can refer to this article "Differences among Apple ProRes codec". Step 3: Customize output ProRes parameters.Open "Profile Settings" window to adjust the output video codec, size, bit rate, frame rate, audio codec, sample rate, bit rate and channels.Step 4: Convert XAVC S Video to FCP X.Hit the convert button under the preview windows, the program will start XAVC footage to Apple ProRes MOV conversion for Final Cut Pro X.When the conversion is completed, run FCP X and import the ProRes codec footage for post production workflow.If you are running on Windows,for other windows NLEs please get Pavtube Video Converter.Read More: