Thursday, December 11, 2014

Mix andConvert Multi-track MXF Files From Avid to MP4?

I am a Producer and Photographer, we have some muti-track MXF from Avid Media Composer about a program for swiss national tv. I was wondering if the MXF files works with TV programs natively. Can I play these MXF files from Avid, and it would be great if anyone could help me with the effective workflow. 

Though MXF is great video format to record high-definition videos, it is not easy to use in that they are not supported by most websites, tablet, smartphone and TV. That is to say, we can't play MXF video on them directly. The easy workaround to get the work done is to transcode these multi-track Avid MXF files to MP4 videos, which is almost used anywhere. The following guide shares with you the way converting muti-track MXF to MP4 format. 

First of all, free download Pavtube iMix MXF

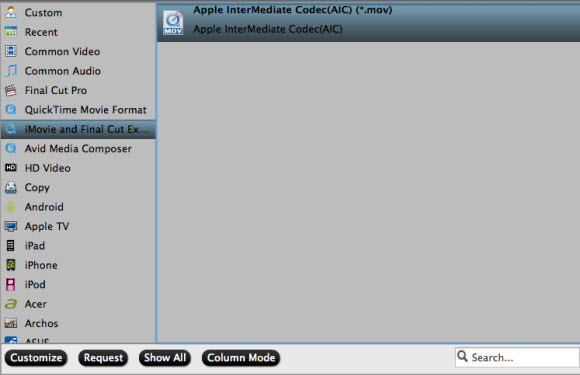
It's a professional multi-track MXF Converter for Mac is strongly recommend for its reliable work efficiency. It can help you to mix and convert multi-audio MXF to MP4 or other playable video formats,such as AVI, MOV, WMV, M4V and MPEG easily on windows and Mac. On one side, the avi, wmv, mp4, mov, mpeg video formats are usually for playback, you can also choose AVI/MOV friendly codec for editing in software, like prores codec for FCP, and AIC codec for FCE and iMovie. This article will show you the steps. 

How to mix and convert to MXF convert multi-track MXF from Avid to MP4 on Mac? 

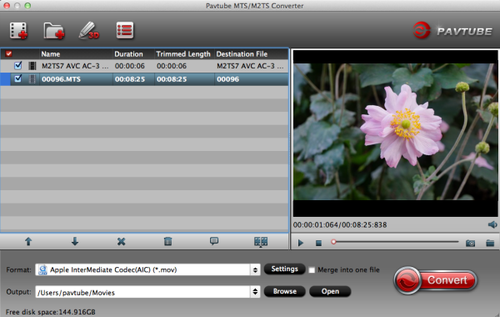
1. Get this iMix MXF installed on you Mac; get ready for the subtitles you want to add; then launch this multi-track MXF Converter. Click the top left two icons to load your Avid MXF files. 


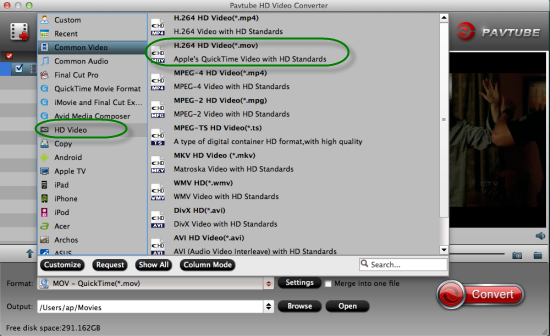
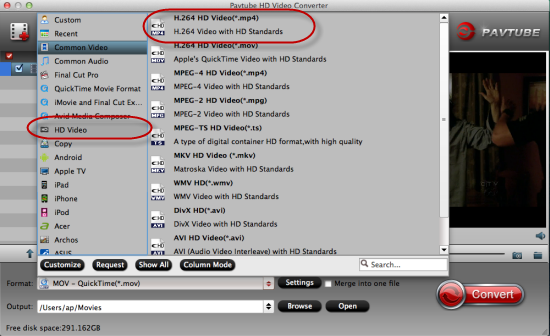
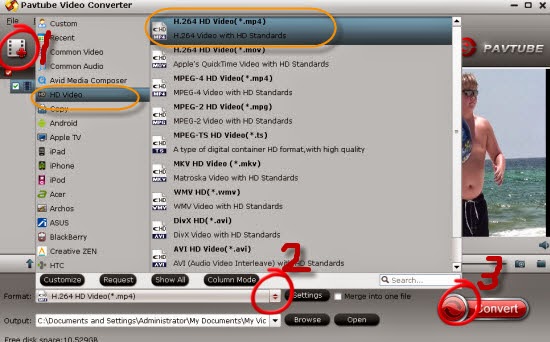
2. Click "Format" to find "Multi-track Video", choose "Multi-track MP4 (*.mp4)" for playback on Mac. 

You can also click Settings right beside to set up outputting video bitrate, frame rate, codec and size all according to your needs. 


3. Set multiple audio tracks for MP4 video. 

If you do not need all audio tracks for output, click "Settings" button you are allowed to uncheck the audio tracks you do not want for output. And you can choose to keep default settings or adjust parameters, like codec, bitrate, channels, etc, according to your different requirements. 


Tips: If you need to mix multiple audio tracks into one track, go to check "Mix into one track" on the lower left. Conversely uncheck it you will get multiple audio tracks separately.

4. Click the red circle to start converting Avid MXF to MP4 with srt/ass subtitles embedded. Wait for a while, click "Open" to locate the converted MKV files. 

Pavtube iMixMXF($45) is a powerful MXF Converter for Mac program will all audio tracks preserved in MKV, MP4, MOV for playing and Apple ProRes for FCP editing. 


Tips:

1. If you prefer to work with single audio channel and do not need to multi-track integration feature, you are suggested to try Pavtube MXF Converter for Mac (only $29) with also subtitles embedded. 

2. Good news for Blu-ray/DVD fans! Pavtube studio now provides ByteCopy for Mac plus iMixMXF bundle, saving $17 immediately! (ByteCopy for Mac is a multi-track featured blu-ray ripping program. With it, you can easily backup blu-ray to lossless multi-track MKV without any quality loss, transcode to multi-track MP4/MOV/ProRes and other mainstream video formats.) 

See more Multitrack MXF video tips: 

Wednesday, December 10, 2014

Play Various Camera Videos on QuickTime 7

How will you guys do to deal with the various camera videos? This guide below showed us a way on smoothly watching videos on QuickTime from many cameras.


Summary: Any media players have their own limited video formats so they usually cannot accept all different videos, right? QuickTime 7 is the main character in the following guide. We can offer you the best effective solution on how to watch various video footage on QuickTime 7.

‘I’m an assistant of a famous videographer and usually, I need to convert so much video footage for a nice playback on QuickTime which from different cameras. You know not all of them can be accepted well by QuickTime so I tried several video converting tool, neither of them can hold all different videos. Any better method there?’

Yes, for a generally speaking, QuickTime 7 has the MOV as the best so we need to do changes in so many other formats such as MTS, AVI, WMV, MXF, etc. While for Mac users, we have already been used to working the QuickTime as the best media player, right? Fortunately, is that cool if I told you we have found a QuickTime video converter can do this job well? Pavtube HD Video Converter for Mac is such the best one especially for Mac users. Also Windows version is allowed here if you need.

With a good reputation online, this program has the strong ability of supporting various video formats as import and output. What’s more, it also can offer us the specific output items, QuickTime is of course included. You won’t be disappointed with the easy operation and strong function.

Could you tell me more details on how to work this program well to make various footage friendly with QuickTime 7?

Download and install it correctly on your computer, we should load our source files for the first step. ‘Add video’ and ‘Add from folder’ can help you in this way. Additionally, this program could preserve your videos as original high quality here. For QuickTime 7.just come to the ‘HD Video’ to choose the ‘H.264 HD Video (*.mov)’ as the most suitable one. 


For advanced adjustment? Why not click the pencil icon called ‘Edit’ to make your videos more beautiful with a perfect enjoyment on QuickTime 7? Here, we can decide where to start and where to end by ‘Trim’ or get rid of the unwanted edges. You’d better have a try here by yourself.


Finally, go back to the main interface, the big red button ‘Convert’ is waiting for your starting. After that, no matter for any camera footage, you can enjoy them smoothly on QuickTime 7. Let’s do it!

More:

Tuesday, December 9, 2014

Smoothly Edit Canon XA25 AVCHD MTS in iMovie 8/9/11

Description: Follow this article to learn how to edit Canon XA25 AVCHD in iMovie 8/9/11 on Mac. The latest Mavericks is also supported!

"Recently I got a Canon XA25 as gift for the new Year. I shot lots of footages and really enjoy it. I saw my friends shared his Canon XA25 videos edited in iMovie, but when I try to playback the footage (I can only found the AVCHD file in memory card), quicktime did not like to open it nor did my imovie 11. Did I miss something?"


If you’re in the same situation as above, you can read on the article to learn more, which mainly shows you how to get Canon XA25 mts footage and iMovie 8/9/11 to work beautifully.

The basic reason why you can’t successfully ingest those recorded AVCHD footages to iMovie 8/9/11 is limited by the iMovie itself. Currently iMovie doesn't supports the original MTS footages from XA25, no matter the version you have. In order to import Canon XA25 AVCHD footage into iMovie 8/9/11 for smoothly editing, you can use 3rd-party software to re-wrap and convert Canon XA25 MTS to AIC encoded mov format first, which is a native format for iMovie 8/9/11.

To achieve your goal, Pavtube MTS/M2TS Converter for Mac is an ideal MTS to AIC Converter for Mac to transfer Canon XA25 AVCHD recordings for iMovie 8/9/11 editing.

Step 1. Free Download Pavtube MTS to AIC Converter for Mac. This software can convert Canon XA25 AVCHD MTS video to iMovie compatible formats or other common formats.

Step 2. Install and run this Mac AVCHD to AIC MOV Converter. This professional Canon MTS to Mac Converter can help you convert Canon XA25 AVCHD MTS files to rich formats for use on Mac.


Step 3. Click format column to choose the output format for iMovie. Click and choose "iMovie and Final Cut Express -> Apple InterMediate Codec (AIC) (*.mov)", it's the best format for iMovie - to import Canon XA25 MTS clips to iMovie 8/9/11.


Step 4. Click "settings" button to adjust output parameters, such as resolution and bitrate.

Tips: You’can set the video frame rate as 30fps, video size as 1920*1080 for for further editing with iMovie.


Step 5. Click convert button to start converting Canon XA20 MTS footage to AIC MOV.

After the MTS to AIC converter finished transcoding, you can run the iMovie 8/9/11 to import the converted files and edit Canon XA25 MTS in iMovie without any rendering or compatibility issue.

File Importing Steps: How to import video files or projects to iMovie 8/9/11 on Mac?

Read More:

Monday, December 8, 2014

Download YouTube Videos to PS3 for a Playback on TV

In this paper we can learn how to download YouTube videos to PS3 and watch them for enjoyment on TV.


Summary: In order to enjoy the nice YouTube videos on our TV with PS3. Usually, with the PS3 Media Server, we can transfer our videos to TV but you know especially for YouTube videos, they are not so suitable for PS3, right. Let’s find the solutions below:

Do you love enjoying YouTube videos online? Funny? Interesting? Or tounching? These videos on YouTube are always from our real life which recorded by other video lovers. I don’t know if you ever record some interesting videos and upload them to YouTube for a sharing? Nowadays, to enjoy the modern technology of our life, more and more people would like download these videos on TV with PS3 for a better enjoyment, and you?

How to play YouTube videos on TV smoothly with PS3?
Surely with the PS3 we can easily sync our videos on TV however, how could we successfully stream our YouTube movies to PS3? Of course PS3 Media Server can do us a favor but not all video formats it can handle well. The YouTube FLV is the typical one. Here we strongly recommend you the YouTube to PS3 Video Converter for Mac to you, which can easily convert FLV videos to MP4 for a playback on PS3. Also, Windows version we can download in this way.

Step-by-step guide allowed here we can take a reference:
Download and install this converting program on your computer, the main interface may pop up there. Two button called ‘Add video’ and ‘Add from folder’ on the left corner could help you out when importing your original videos. For PS3, we know MP4 is the suitable one for output right? So on the output list, in order to preserve the original high quality videos, we suggest you to choose the ‘HD Video’>>’H.264 HD Video (*.mp4)’ as the best one. Look the screen shot here:


Additionally, there are some advertisements that often annoy us a lot, do you wanna drop them off? Click the ‘Editor’ on the main interface, ‘Trim’ there we can decide where to start and where to end, so it is convenient for us to get rid of the advertisements. Some other items we can also have a try like ‘Crop’ ‘Subtitles’ etc. Thus we also call this program as a ‘Tiny Editor’.


At the end, back to the main interface, could you see the big red button named ‘Convert’? It is the ending icon if you are sure you did all the preparation work. Any other troubles you can leave some messages below. Thanks for reading!

More:

Friday, December 5, 2014

Encode 5.1 Channel AAC/DTS/WAV to AC3 5.1/Stereo

From this article, we may know more details on how to encode 5.1 channel AAC/DTS/WAV to AC3 5.1/Stereo in a nice way. Have you got any experience of encoding your 5.1 audio channels?


First of all, what we are going to talk about the topic is the 5.1 audio channels. In the following article, we can get a 5.1 channel converter which can be an audio assistant that help us encode 5.1 channel AAC/DTS/WAV to 5.1/stereo AC3. Or enjoy MKV FLAC on HDTV? Let’s have a look here. 

As you know, different media players support different audio codec, so for a nice enjoyment, sometimes it is necessary for us to do some changes with the original audio files, right? As usual, some common audio converters on the market may might handle this kind of job but especially for 5.1 channel,, not all the converters could handle 5.1 well in a perfect effect. Fortunately, Pavtube Video Converter for Windows/Mac can be a better choice for you.

A brief introduction of this 5.1 Audio Channel Converter here:
It is an excellent 5.1 channel audio converter that can handle various output audio formats like AAC, AC3, AIFF, AU, OGG, WAV, FLAC, MP3, OGG WMA, etc. Also it can transcode AVI, MKV, MP4 video files with AC3, AAC, DTS 5.1 channel sound track to AC3, MP3, AAC 5.1/stereo.

Start the steps to know how to encode our 5.1 channel AAC/DTS/WAV to AC3 5.1/Stereo. 
Start up video converter as a professional 5.1 channel video audio converter. When its main interface pops up, click the ‘Add video’ to load your original videos in. Tap the ‘Format’ there and get into the output list, choose the ‘Common Audio’>>’AC3-Dolby Digital AC-3(*.ac3)’ as we need. Look the screen shot as follows.


Then don not forget to custom our audio encoder, in ‘Settings’ button, could you see the audio settings there? Here, we should set our audio codec as ‘ac3’ and channels as ‘5.1’ or ‘stereo’. Additionally, sample rate and bitrate we can also set the default as we like.


In the end, just g to the main interface and hit the ‘Convert’ to start converting 5.1 channels AAC/DTS/WAV to AC3 5.1/stereo. Remember there are two different windows version and Mac versions, choose one you like. Welcome to offer some other suggestions and advice as the comments below.

More:

Wednesday, December 3, 2014

Need Tips on Importing MTS to Corel VideoStudio Pro X7?

Is there any efficient tips on importing MTS files to Corel VideoStudio Pro X7? Maybe in the following article you can find some solutions.


Not know much about Corel VideoStudio Pro X7?
For Mac users, you may know clearly about some common editing apps such as FCP, iMovie, or FCE etc. While for Windows users, besides the Adobe and Movei Maker, we also have Corel Video Pro X7, which allows both storyboard and timeline-oriented editing. Using new Motion Tracking to follow moving objects on screen and attach graphics and text. However, as you know different video formats supported by source clips in Corel VideoStudio. Edit MTS in VideoStudio Pro X7 is not an easy matter.

Want an enjoyable playback on PC after a dispose in Corel VideoStudio?
As MTS files are usually shot by some HD cameras, no matter as Sony, Canon or Panasonic, etc. It is awesome to enjoy out recordings to know how much we learned there. Unfortunately, do you know Corel VideoStudio Pro X7 has its own personal format WMV. So how could it be possible to make our MTS files accepted by Corel VideoStudio? We need the Pavtube Video Converter to do a big favor.


How can this MTS to VideoStudio Converter do this job well?

As a professional video converter, it surely has the various import and output choices with an easy operation. Would like to listen to me about the details on how to convert MTS to the most suitable WMV for Corel VideoStudio Pro X7?

Launch and open this program, what you find there are some main items on the main interface. To load our files in? ‘Add video’ on the left corner may handle this job well. Or in other ways, you can directly drag your footage in if you have connected your camera or source device to your computer. Then here on the output list, we suggest you to choose the ‘Adobe Premiere Pro/Sony Vegas’>>WMV(VC-1)(*.wmv)’ as the best one.


What I have to mention here this program also has the simple ‘Edit’ item for our advanced users. All of us can go to the ‘Edit’ to adjust our videos as we like. Such as the ‘Trim’, ‘Crop’ or ‘Subtitles’, etc. You may enjoy the effects in the preview window below. Go to have a try! You won’t be disappointed!


Tips: If you got the MXF files instead of MTS, why not take this article of MXF to VideoStudio for a close reference?

With all your preparation work done? Back to the main interface and click the ‘Convert’ button to finish your work! With the 6X faster conversion speed that other similar programs, it won’t take you so much time for waiting.

Read More:

How to Solve the freezes when importing MTS media to Premiere CC-2015.3?
How to Convert MTS/M2TS with Handbrake Easily?
Best Solution to Play Sony MTS/M2TS Files on MacBook Pro
Play MTS on Smart TV (Windows and Mac Solutions)
Top 5 MTS/M2TS Video Editors for Mac
Top 5 MTS/M2TS Video Editors for Windows (10, 8.1, 8, 7, XP, etc)
Fix Choppy Issues When Importing AVCHD Files to FCP
Join and Convert MTS/M2TS Files for playing with VLC Player
How to Convert 3D AVCHD MTS to 3D Tablet for Watching?

Monday, December 1, 2014

Natively Import AVI Files Recorded From Bandicam to Lightworks Pro

How to nicely import AVI files from Bandicam to Lightworks Pro for a further editing? In the following article you can get some useful tips.


Meet trouble in working AVI files with the professional non-linear editing software Lightworks Pro? Actually, it is necessary for us to pay attention, right? Such similar questions are appeared frequently in our editing area. Just like the example below:

‘I am attempting to edit some clips I shot while playing a game. I recorded them with Bandicam, and they are all saved in .avi format. When I try to import one, it says that the audio format is unsupported. Does anyone know of a way that I am either make the video format compatible with LWKS or do I need to convert the videos to a different format and then import?’

Frankly speaking, Lightworks supports a broad range of codecs, but they must adhere to professional television standards. If you read about the codecs it supports on the Tech Specs page, you will find the point! Yes, MP4 is the native supported format for Lightworks Pro. So we could make the trouble easier, right? With the a AVI to Lightworks Pro Converter, we can natively change AVI into MP4 for a further editing.

Several step-by-step tips are allowed here, would like to take as a reference? You should download and install the program for a first step, to choose a output format available for Lightworks, I suggest you to select the ‘HD Video’>>’H.264 HD Video (*.mp4)’ as the best one. Also, you can tap ‘MP4’ in the searching box to search it well.


Tips: For other additional functions you can try on the main interface, such as the ‘Settings’ to adjust your video size, bitrates, etc. Or the ‘Editor’ to make your files in a simple dispose, both of them are deserved to take a look. Here I want to introduce the ‘Merge into one file’ item which can combine your file clips into one on your computer. Is that cool?


All the functional items ther you can have a try! Finally, if you did all your work done, it's time to click the 'Convert' to get your work started. With a faster conversion speed there, you can save a lot of time of waiting!

More: